Introduction to SAP basis
SAP Basis refers to the administration of SAP system that includes activities like installation and configuration, load balancing, and performance of SAP applications running on Java stack and SAP ABAP. This includes the maintenance of different services related to database, operating system, application and web servers in SAP system landscape and stopping and starting the system.
The key responsibilities of SAP Basis Administrator include −
- System installation and Configuration
- Load balancing on servers
- Performance management of different components
- Managing interfaces and integration with servers
- Managing servers and different services
With the help of SAP Basis, different SAP modules like Finance Accounting, Production Planning, Sales and Distribution, SAP EWM and other modules can integrate and communicate with each other.
SAP Basis supports the installation and configuration of SAP applications on different operating systems like Windows, Unix, AS/400, etc. and different databases like SQL Server, Oracle, IBM DB2 for back end database.
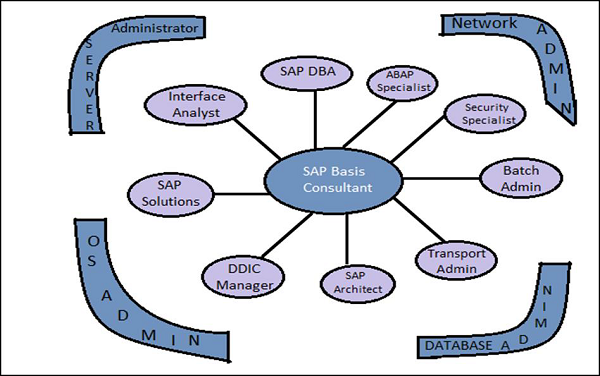
This picture defines the key activities that involve the role of SAP Basis Consultant. The roles of the SAP Basis Consultant are divided into the following categories −
Solution Specialist
The Solution Specialist is responsible for −
- Upgrading the SAP version of system landscape
- SAP Data backup archive
- Migration of Operating system and Database
- Installation of AP/Add On
Interface Analyst
The Interface Analyst is responsible for −
- Configuration and set up of interface between different modules
System Administrator
The System Administrator is responsible for −
- Monitoring the performance of SAP system and modules
- Maintaining SAP system health and performing health checkup
SAP Database Administrator
The SAP Database Administrator is responsible for −
- Backup and restoring the database of SAP system
- Managing database objects
Transport and Batch Job Administrator
The Transport and Batch Job Administrator is responsible for −
- Managing batch job scheduling and replication
- Managing SAP Control access in system landscape
DDIC Manager
The DDIC Manager is responsible for −
- Managing changes to Data Dictionary
SAP Architect
The SAP Architect is responsible for −
- Designing work and data flow in the SAP system
- Managing SAP sizing
SAP ABAP Specialist
The SAP ABAP Specialist is responsible for −
- Troubleshooting and tuning of ABAP Programs
- Applying correction to Programs as per SAP
- Coding and customization of ABAP program as per requirement
Transaction Codes
There are various Transaction Codes (T-codes) that a SAP Basis Administrator uses to perform the assigned tasks. The following is a list of important SAP Basis T-codes −
SM02 − To send messages to users who are logged in and new users logging to the client.
SM01 − To take control of transaction codes. In case, the business requires that the users who are authorized to carry the transactions are to be stopped temporarily.
SM04 − To check the number of users who are logged into the system and in which client and how many sessions each user is generated and in each session what transaction is being executed.
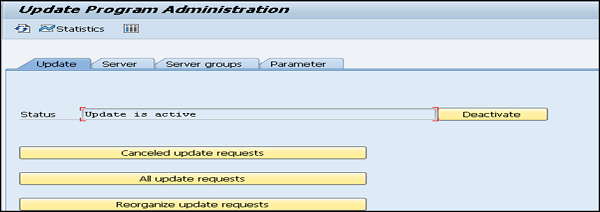
SM13 − To keep track of the status of the Update service is Active, in case it is not active then we activate from the Update Administrator
SM37 − To monitor the status of the jobs that are created by a user and for specific dates.
PFCG − This is used to maintain roles in SAP system.
SM21 − SAP system log is displayed for the values inputted in the initial screen. The values that can be maintained is the From Date.
RZ20 − This is used for cross system monitoring. In this transaction, we have a tree structure that performs a set of transactions and also keeps a track of all the alerts that were captured during the operation of the system
SAP Basis - Installation of SAP GUI
SAP GUI is a client tool which is used to access remote central server and runs on different operating systems like Microsoft Windows, UNIX, Mac, etc. This is used to manage and access SAP applications like SAP ECC and SAP Business Intelligence System.
Advanced Features in SAP GUI
The following are the advanced features of SAP GUI −
Blue Crystal design
SAP Blue Crystal is a new visual design theme which succeeds Corbu. It provides a consistent design that allows users to seamlessly experience SAP GUI and NWBC elements.
It is the standard theme of Fiori applications and comes with a new color palette and icons which are better scalable.
The background texture has a stroke pattern in white and light blue with a gradient layer.
As it replaces Corbu with Blue Crystal, this integrates SAP GUI for Windows 7.40 and NWBC 5.0
Complete icons redesign for Blue Crystal
All SAP GUI icons used by SAP applications have been redesigned and are now fitting the Blue Crystal Design. Additionally, they are much better scalable than before. The new set of icons is exclusive to Blue Crystal Design.
New default color for Blue Crystal icons
When you use it with patch 2, the main color changes from blue to dark gray in order to harmonize the design with the Fiori Application design.
Supported Available Versions for Different Platforms
The following are the supported available versions for different platforms −
- SAP GUI for the Windows environment
- SAP GUI for the Java(TM) environment
- SAP GUI for HTML / Internet Transaction Server (ITS)
SAP GUI has been released separately for Windows and Java support and the latest version for Windows and Java is 7.4.
Microsoft Windows Release
SAP GUI 7.4, the latest version for Windows was released in October, 2014 and it supports various features like — it is by default installed with NWBC 5.0 and SAP GUI and GUI shortcuts are launched through NWBC.
However, you also have the possibility to use SAP GUI and NWBC in parallel. To do so, you merely have to select the new component Install SAP GUI Desktop Icon/ Shortcuts to install the SAP Logon (Pad) Desktop Icon and to register SAP GUI shortcuts to SAP Logon.
JAVA Release
SAP GUI 7.4 is the latest version for JAVA. This provides support to other operating systems and was released in October, 2014. As SAP GUI for Java 7.40 is not available on DVD right now, you need to proceed to the patches section on the SAP Support Portal to download SAP GUI for Java 7.40.
Downloading SAP GUI from SAP Marketplace
The following are the steps to download SAP GUI from SAP Marketplace −
Step 1 − To use SAP GUI for accessing remote central service, you have to first download it from SAP Market place.
Step 2 − Go to- service.sap.com to login to SAP Market Place.
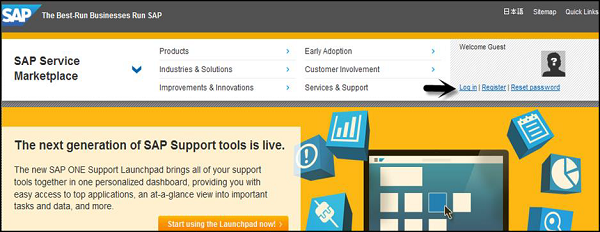
Step 3 − Login using SID SXXXXXXXX and password. Once you login, go to Products > Software Downloads
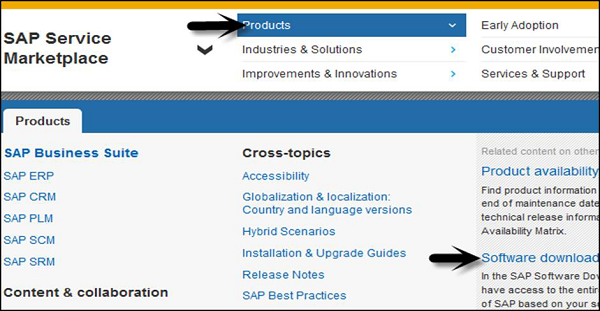
Step 4 − Under Software downloads, go to Installation and upgrades. Follow the alphabetical order A-Z and select ‘G’ from list.


Step 5 − Select platform from the list available, you can select SAP GUI for Windows, SAP GUI for JAVA, and SAP GUI for Windows for S/4. Once you click there, you can see detailed information about all that is there in the latest version of SAP GUI — features, support lifecycle, dependencies, general information, etc. on Info Page.
Support Lifecycle
SAP GUI for Windows 7.40 was shipped in "General Availability" (released for productive usage) on 8th October, 2014. When planning a SAP GUI upgrade, please consider moving directly to release 7.40.
Please consider these end of support dates when planning or reviewing your frontend landscape −
- On 9th of April 2013 support for SAP GUI for Windows 7.20 ended.
- On 15th of July 2015 full support for SAP GUI for Windows 7.30 ended.
- On 31st of October 2015 restricted support for SAP GUI for Windows 7.30 will end.
- On 9th of January 2018 support for SAP GUI for Windows 7.40 will end.
Also consider, SAP Notes — 147519
Go to Download ← Select files to add to the download basket.
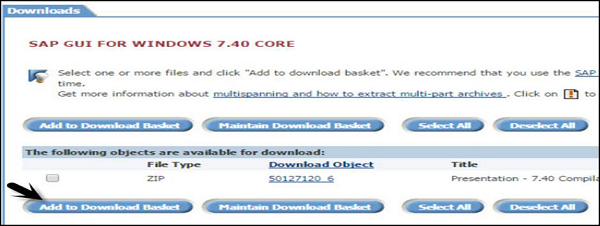
You can get it from the download basket later on. Save the file to the local system and run the setup. You can select to choose from different components −
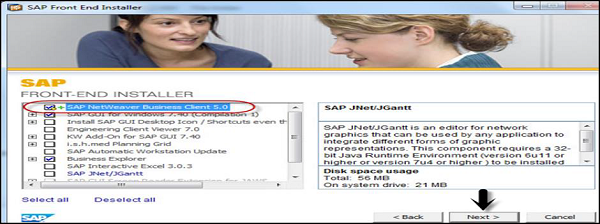
Press Next > Finish the setup.
SAP Basis - GUI Selection
As mentioned, there are three different GUIs available and we can select the right version based on the requirement. The following scenario can help you find a suitable SAP GUI −
When users are working rarely in the SAP system
Suppose most of the users fall in this category, then it is suggested to use SAP GUI for HTML format. This allows you to save effort and money for client deployment.
When users are working mostly in the SAP system
In a case such as this, SAP GUI for Win dows or SAP GUI for Java is recommended.
When users are ABAP developers
For ABAP developers, it is recommended that they use SAP GUI for Windows.
When users use operating systems other than Microsoft
It is recommended they use SAP GUI for Java and HTML or they can use the SAP GUI for Windows on a remote server.
When users are integrating Dynpro transactions to the Portal
It is recommended they use SAP GUI for HTML. This allows you to integrate classic Dynpro-based applications into the portal easily.
SAP Instance and SID
A SAP instance is when you install and configure a SAP system. This instance defines a group of resources — memory, processors and other resources in the system. This allows users to login to the SAP system and share the same resources.
SAP instance is managed by CCMS. Users can login to the SAP system using an instance.
A SAP system can consist of one or more instances — you can set up a SAP system with a single instance with only one CCMS or you can configure a system with two or more separate instances in client/server environment.
Configuring a SAP instance
You need to follow these steps to configure a SAP instance −
Step 1 − You need to define separate directories for UNIX, AS/400, or Microsoft Windows NT server on which the instance is to run.
Step 2 − You can use a shared file system.
Step 3 − For each instance, there are entries created in operating system configuration files (/etc/services, /etc/sapconfig…).
Step 4 − There are communication entries created in the host.
Step 5 − For each instance, start and system profiles are created.
Step 6 − For each instance, operating system users are installed.
Creating an instance for one server
You need to follow these steps to create an instance for one server −
Step 1 − To create an instance, you should first define the mode of operation.
Step 2 − To create an instance, go to CCMS > Configuration or use Transaction code RZ04.
Step 3 − Go to instances/operation modes as shown in shown in the screenshots below.


Step 4 − To create a new instance, click on create new Instance — (F6) option as in the following screenshot −

Step 5 − Enter the host name and click on current settings. When application server is already running, the system will display the current settings for that instance.
Step 6 − If the application server is not running, you should use the input help to display the possible entries and fill the below values.
Step 7 − Enter the host name and choose current settings. If the application server is already running, the system will display the current settings for that instance. However, if the application server is not yet running, you should use the input help to display the possible entries and fill in the following fields−
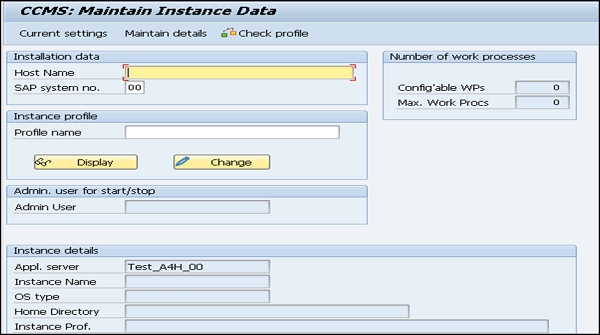
SAP System Number
The SAP System Number is the number that is mentioned when the SAP System is installed.
Start Profile − Profile Name
Insert the name of the start profile from Profiles to start the instance. You can also click on “choose the input help” to display a list of available start profiles. You can select a profile from the available list.
Instance Profile − Profile Name
You have to select the name of instance profile from Profiles to run the instance. You can click on “input help” to display a list of available instance profiles.
To save the instance, click on Save button at the top > Continue
Maintaining Instance Definition
When you define operation modes, you need to maintain instance definition. Follow these steps to change the definition −
Step 1 − Use Transaction Code: RZ04.
Step 2 − Select Instances/operation mode
Step 3 − Select an entry from the list of productive instances.
Step 4 − You can then change the data for that instance.

Step 5 − You can also delete an instance, operation mode using the same transaction code.
Step 6 − To delete an operation mode — From the list of productive operation modes, position the cursor on a line with the operation mode. Select operation mode > Delete. This deletes the operation mode, and all the instances and work process definitions assigned to it.
System Landscape & Architecture
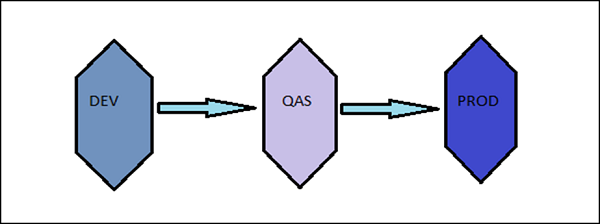
SAP system landscape is defined as an arrangement of SAP servers. Ideally, in a Sap environment, a three-system landscape exists. A system landscape consists of Development Server (Dev), Production Server (PROD), and Quality Assurance server (QAS).
SAP Architecture is defined as a technology framework of SAP system and it changes with time unlike the system landscape. SAP Architecture changes with new software like SAP ECC 6.0, the most recent one.
The following is a request in SAP System Landscape −
DEVELOPMENT >>>> Quality >>>> PRODUCTION
The following figure represents SAP three tier system landscape where work flows from Dev > QAS > PROD and not in backward direction.
Let us now discuss the system landscape −
Sandbox Server
When a project is implemented, at the initial stages, a sandbox server is used where all the customization, configuration is performed.
Development Server
Next is to save the configuration in development server and saved in workbench requests and this has to be transported to Production server.
Production Server
You can consider it as the final or the most refined stage where the work is done when project is in production/go live. All the changes that are required by the client are performed in the DEV environment and later, the request is transported to production.
SAP System 3 – Tier Architecture
The image given below shows 3-tier architecture of the SAP system. The presentation layer is the topmost one. This contains the device/application to control the SAP system. This can include mobile devices, end user systems or SAP GUI or web browser based client.
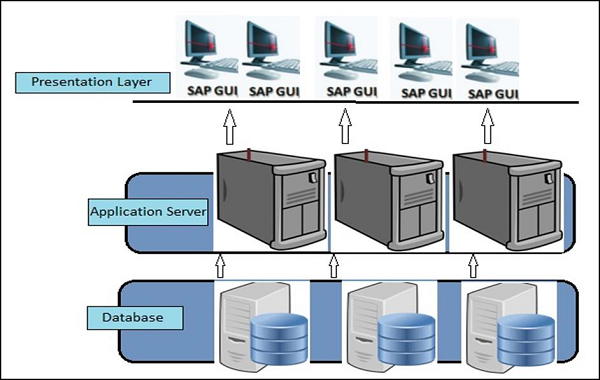
The presentation layer communicates with the application server to perform all the processing and which is known as brains of an SAP system.
An application server consists of multiple instances and communicates with the database layer of the three-tier architecture.
The bottom layer is called the database layer. This is responsible to store all the data. The database of SAP system is kept on a separate server for performance and security reasons.
The presentation layer consists of different components for ABAP and JAVA that enables the communication and processing of data in SAP system.
The key components of the presentation layer include the following −
Message Server − This is used to manage communication between distributed dispatchers in the ABAP system.
Message Server − This is used to manage server processes and JAVA dispatchers. It is used to manage communication within JRE.
Dispatcher Queue − This is used to store multiple work process types.
Dispatcher − This is used to distribute the requests to the work processes.
Memory Pipes − This is used to manage communication between ICM and ABAP work processes.
Enqueue Server − This is used to handle logical locks set by the executed Java application program.
Java Dispatcher − This is responsible to receive the client requests via presentation layer and forward to the server process.
Gateway − This is used to manage communication between SAP system and external systems.
ABAP Work processes − This separately executes dialog steps in R/3 applications separately.
SAP Basis - Hardware & Software Installation
To implement SAP ERP, we need to find out the minimum hardware and software requirements. The minimum system requirements should be met to perform the implementation successfully.
The following are the minimum requirements for SAP R/3 installation −
Minimum hardware requirements
- CPU: Intel PIII 500 MHZ
- HDD: 30 GB
- RAM: 256MB
- Ethernet Card for LAN connectivity
Minimum software requirements
- Windows Server
- Windows Server Service Pack
- Internet Explorer
- Database Software Ex: Microsoft SQL Server
- SAP R/3 System
- Report Data CD
- Export CDs
- SAP GUI
- SAP R/3 Kernel CD
- Dynamic Link Libraries or DLL
- Active Directory Service Interface or ADSI
- Microsoft Management Console or MMC
Hardware requirements to install SAP ECC 6.0
- HDD − 250GB + 45GB Hard Disk Space
- RAM − Minimum 4 GB of RAM — The more the capacity of RAM, the less time it takes for installation
- CPU − Intel Dual Core or Core 2 Duo Processor — If you have a 64-bit processor, you can go for ECC 6.0 EHP4 instead of ECC 6.0 SR2.
- CD Drive to copy the software
Software requirements to install SAP ECC 6.0
- Windows server 2003 32-bit SP 2 or Windows Sever 2003 64-bit OS.
- Driver CDs
- Adobe Acrobat Reader for Installation Manual
SAP ECC 6.0 ides SR2 installation will be completed approximately in 20 hours with the above configuration. The installation time can be reduced further by upgrading hardware configuration like quad 2 core processor with 8 GB ram and 1 TB Hard Disk Drive.
Note − You can download SAP ECC 6.0 free trial from SAP Market place. It is also possible to integrate SAP ECC 6.0 trial using SAP Cloud Appliance Library ACL to AWS or other cloud environment service provider by providing user public cloud key.
Installation of SAP ECC 6.0
Follow these steps to install SAP ECC 6.0 −
Step 1 − Install database as per the requirement. Java JDK 1.4 is the minimum requirement. Copy the software to local drive and run sapinst.exe. Set up wizard will open.

Step 2 − Select the service you want to install — Central System Installation > Select Service Type – Typical or Custom > Next

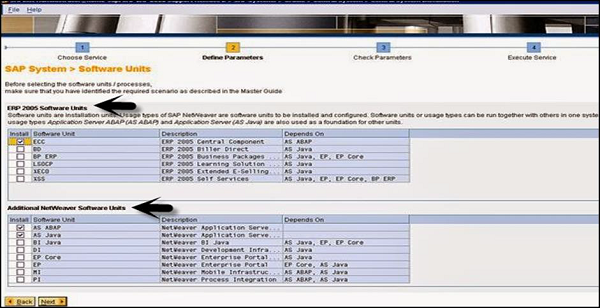
Step 3 − Select the software units you want to install with ECC like Biller Direct and additional NW software units AS ABAP, etc.
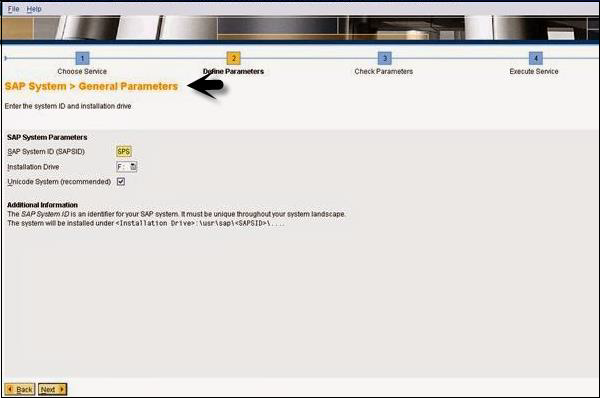
Step 4 − Enter the SAP System ID and Installation drive. SAP System ID is a unique identifier for your SAP system. It must be unique throughout the system landscape. Enter master password which will be used for all user accounts to be created.
Step 5 − Enter Database parameters like DBSID for an existing database, host name, etc.

Step 6 − Perform perquisite check. You can click OK to perform check or cancel to move to next step.
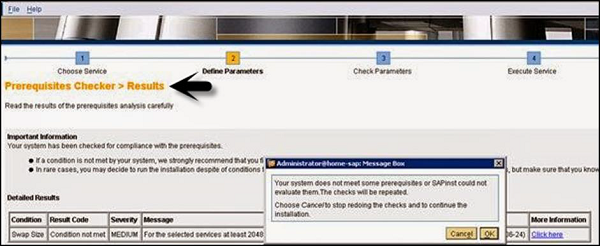
Step 7 − In the next window, you have to provide the location of export files, oracle client and kernel files > Next > Enter OS passwords.

Step 8 − Enter the central instance number, which serves as the technical identifier for controlling internal processes such as memory. This number must be unique for this installation.
Step 9 − The system now shows you the port numbers.

Step 10 − Click Next and you will see the summary of installation.
Step 11 − Enter the Solution Manager key to continue the installation and upgrade process.
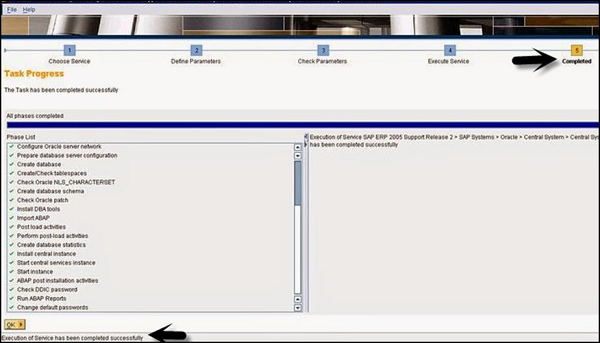
Step 12 − Once the installation is complete, you will receive the following confirmation.
Different Hardware and Software Components in SAP System
The following are the key components in SAP system −
- Database Server
- Application Server
- Other Servers
- Software components- NetWeaver
- SAP GUI
- License key and Maintenance Certificates
- Enhancement Package
- Upgrade plans
- SAP Solution Manager Integration
In SAP system, to check the list of the currently installed software component versions, you can go to SAP GUI, select system.
Choose System in SAP logon> System > Status > click the Component Information icon under system data.
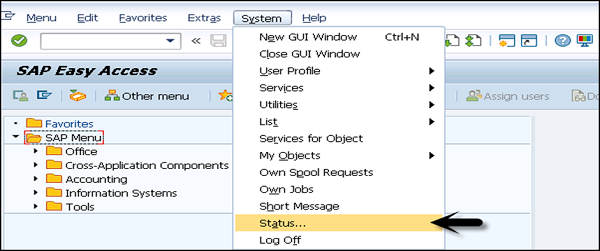
Go to SAP system data → Click on component magnifying glass.
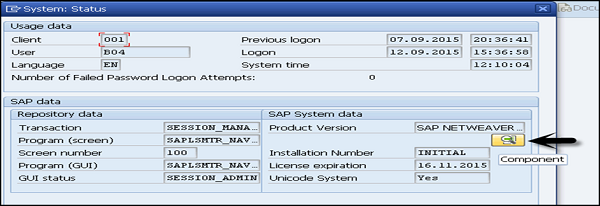
You can see the following two options −
- Installed software component versions
- Installed product versions
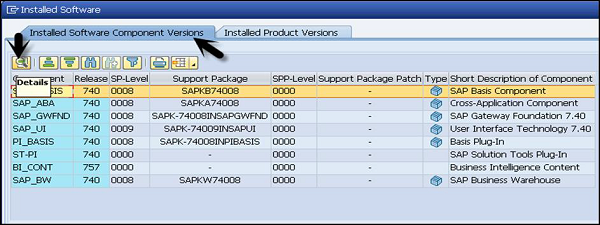
Under installed software component, you can see all the installed software, support package, service pack, description etc. If you want to check the details of each component, you can select the component and go to details tab as shown above.
Go to Installed Product Versions, it will show you the version of the installed SAP NetWeaver.

SAP Basis - NW System
SAP NetWeaver is a web-based, open integration, application platform that serves as the foundation for enterprise service-oriented architecture (enterprise SOA) and allows the integration and alignment of people, information, and business processes across business and technology boundaries. It allows the composition, provisioning, and management of SAP and non-SAP applications across a heterogeneous software environment.
The following table defines the Main Use Cases of SAP NetWeaver and its key area −
| Use Case | Description |
|---|---|
| Data Warehousing | SAP BW |
| Building Integration scenarios | SAP Process Integration PI |
| Mobilizing Business Processes | SAP NetWeaver Mobile |
| Building Composite Applications | SAP Composition Environment |
| Integration with SAP Enterprise Portal | SAP Enterprise Portal |
| Application Development ABAP | ABAP Development on NetWeaver Application Server ABAP |
To implement these use cases, SAP has provided mapping between use cases and SAP NetWeaver software components.
Consider the use case of data warehousing, it has multiple product instances and client tools to use NetWeaver for data warehousing.
| Standalone Engines | Product Instance | Client Tool |
|---|---|---|
| Search and Classification (TREX) |
|
|
SAP Basis - NW Architecture
SAP NetWeaver is one of the central components of the entire SAP software stack and provides you a platform for other components and JAVA and ABAP applications.
SAP Application server consists of multiple application server instances and also database servers. With use of dialog instance, it also contains message server and an enqueue server.
The following is a dialog instance executed by a user −
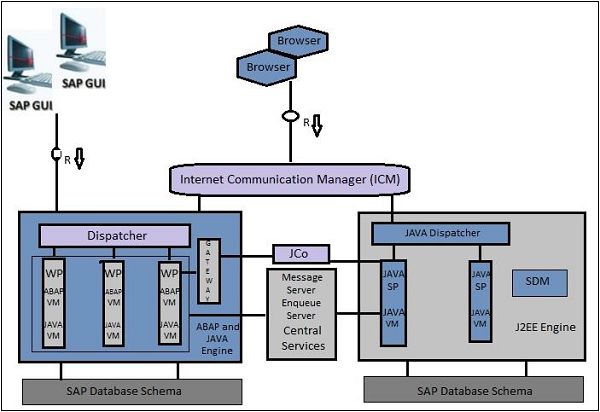
These are the different components of the Dialog Instance −
Internal Communication Manager − This is used to process both client and server web requests. It supports protocol – HTTP, HTTPS, SMTP.
Dispatcher − This is used to distribute the user request to different work processes. If all the work processes are busy, requests are stored in the dispatcher queue.
Work Processes − These are used to execute Java or ABAP programs.
SAP Gateway − This provides RFC interface between SAP instances.
Message Server − This is used for message communication and also balances the load in SAP system.
Installation Options for SAP NetWeaver
SAP NetWeaver provides the following installation options −
- ABAP System − This comes with an integrated VM Container. With this installation, you can run ABAP programs and selected SAP Java applications (shown in left box).
- Java System − The components to the right in the above image constitute the Java System. With the installation of this, you can run J2EE applications but not any ABAP programs.
- ABAP + Java system − All the components shown in the above image constitute the ABAP + Java System.
Application Center and Instances
The SAP NetWeaver work center includes the configuration of the following tools −
Adobe Document Services − This allows you to register the Adobe Reader Rights credentials as well as keep track of all unlicensed interactive form designs in your system.
Application Module − This allows you to view the details of the deployed applications and their modules. Here, you can also perform the run-time configuration of the application modules.
Application Resources − This allows you to enable applications to make use of external resources. A NW Administrator can add or delete the application resources.
Authentication and Single Sign-On − This allows you to choose the required authentication mechanism for your applications. You can configure the following authentication and SSO −
- AS Java as a Service Provider
- Kerberos
Certificates and Keys − This allows you to manage the AS Java certificates and keys.
Composite Application Framework Authorization Tool − This allows you to manage business rules and Instance Level Permissions for CAF applications, business object nodes and AS Java instances.
Configuration Wizard − You can make technical settings required for the technical processing of a system or a technical scenario.
Destinations − This can be used to specify the remote service's address and the user authentication information for remote connections.
Development Infrastructur − This is required while developing with Java and you want to manage it with Transport Management System (TMS).
Identity Management − This allows you as an administrator to control applications access by creating users and providing these users with a means of authenticating themselves to an application.
Internationalization − This allows you to manage data from double stack systems and also used for synchronization purpose.
Java HTTP Provider Configuration − You can create new virtual hosts and configure existing ones for all registered systems.
Java Class Loader Viewer − You can monitor the hierarchy and references between the class loaders in the AS Java.
Java System Properties − Using this, you can view current system configuration of Application server JAVA and you can edit the properties that are marked as online modifiable.
Java Connection JCo RFC Provider − You can manage the Java Connector Remote Function Call (JCo RFC) Destinations. This allows you to create, edit and view existing connections.
JMS Server Configuration − This is used to create new JMS resources.
Licenses − You can request and install new SAP licenses.
Log Configuration − You can view current log configuration, change security or reset it to default.
Message Server − You can monitor message server parameters and settings.
SAP NetWeaver Administrator Tool − SAP NetWeaver Administrator (NWA) is a web-based tool that allows you to perform configuration, advanced administration, and also to monitor, troubleshoot, and diagnose a SAP NetWeaver system.
You can use NWA tool in the following working modes −
- Online
- Local and remote
Managing Java Instances using NWA
Follow these steps to change the status of Java instances at runtime.
Step 1 − Go to SAP NetWeaver Administrator > Operations > Systems > Start & Stop
Step 2 − Now, go to Java Instances tab under NWA.
Step 3 − You can see all available instances with corresponding information about the server processes within the instance.
Step 4 − Select an instance to perform the following functions under NWA −
- Start, stop or restart a Java instance.
- Enable or disable debug mode for AS Java processes.
- View and refresh OS processes.
- Clear the DNS cache for a particular instance.
- Set a number of server processes (nodes).
SAP NW System Landscape
Follow these steps to perform the implementation of SAP NetWeaver system −
Step 1 − Plan the implementation by defining the scope, hardware and software requirements, and release instructions.
Step 2 − Define the system landscape for the use cases.
Step 3 − Install the components of SAP NetWeaver system.
Step 4 − Configure SAP NW systems.
System Landscape Management using SAP Solution Manager
SAP recommends the use of the latest version of the SAP Solution Manager to manage your system landscape. You can download the latest version from SAP Support Portal http://support.sap.com/solutionmanager
It is important to correctly define your SAP system landscape in the following versions of SAP Solution Manager to maintain it correctly.
SAP Solution Manager 7.0
You can use the SAP Solution Manager System Landscape transaction code — SMSY for the complete system description.
SAP Solution Manager 7.1 SP01 to SP04
You can use the Landscape Management Database transaction code — LMDB to maintain technical system information. To maintain logical product information, you can use the transaction code — SMSY.
SAP Solution Manager 7.1 SP05 and higher
You can use the Landscape Management Database transaction code — LMDB for the complete system description and in this, transaction code — SMSY is no longer required.
Verifying Landscape with SAP Solution Manager
To verify and correct your system landscape, SAP recommends that you use the verification functions of the following versions of SAP Solution Manager.
SAP Solution Manager 7.0 to 7.1 SP04
Use Landscape Verification 1.0 for SAP Solution Manager. This add-on allows you to identify and correct issues in your SAP Solution Manager landscape (Transaction SMSY) before they cause problems, for example, during a system update. Example for errors are a missing connection to the System Landscape Directory or the incorrect assignment of products to technical systems. For each type of error, a generic description for the solution is provided.
SAP Solution Manager 7.1 SP05 or higher
Use the landscape verification function that is embedded into the product system editor of the Landscape Management Database (LMDB). It replaces the previous Landscape Verification tool.
SAP Basis - SAP Client Administration
Let us first understand what a client is before we move on to SAP client administration.
A client is used in SAP system for multiple login on single instance. You can create multiple clients on a single instance. It also provides data security wherein, one user with one client can’t see the data of the other user with another client. In addition, there is no need to install the software for each and every user.
Advantages of Client Concept
Client concept comes in with the following advantages −
- You can share the same resources between multiple users.
- You can manage SAP system landscape as you can create multiple clients for DEV, QA and PROD team.
- You can share your SAP system with a large number of users.
- You can create clients in SAP system from 000-999.
SAP system comes with the following three standard clients −
000 Client − This is called master client and is available when you install R/3 system.
001 Client − This client is a copy of 000 client including the test company. This client is used to create new clients normally.
066 Client − This is called SAP Early watch and is used for diagnostic scans and monitoring service in SAP system.

Steps to Create a New Client in SAP
Follow these steps to create a new client in SAP system −
Step 1 − Start by using transaction code — SCC4

Step 2 − To create a new client, enter the below details after clicking on New Entries.

- Client number and name
- City
- Currency, Roles
Step 3 − Enter your client-specific data and set permission for the clients as per your requirement and click on Save.
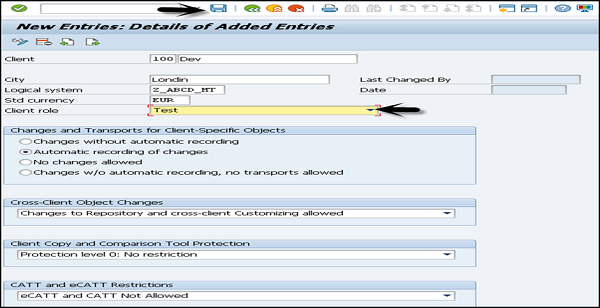
Step 4 − Now, if you go to the Display Client list, Transaction SCC4 > Display > New client will be added.

Local and Remote System
You can also create a copy of existing clients between local and remote system IDs.
Follow these steps to create a copy of existing clients −
Step 1 − To create a copy of a client in local SID, the transaction code is SCCL.

Step 2 − Enter the following details −
Select your desired profile, enter source client, and enter description.
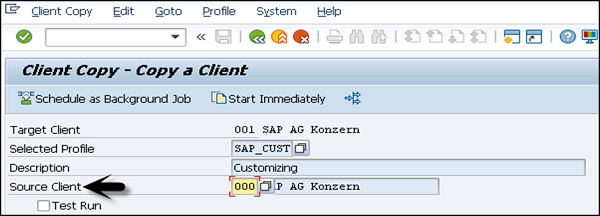
Step 3 − By default, the client copy is executed in a single process and you can distribute the workload on multiple processes to reduce time for copying.

Step 4 − Copying a client can take longer. Therefore, this process can be run as background job.

Step 5 − To check the logs, transaction code — SCC3 can be used.
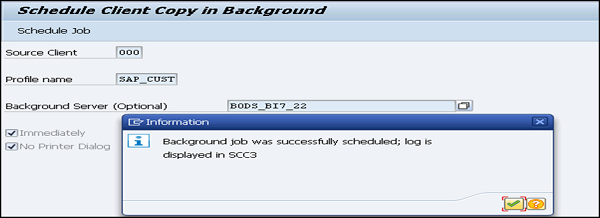
Remote System
You can create a copy of client in the remote system using transaction code — SCC9. This system uses Trusted RFC connection SM59.
Enter the details as we do for local client copy and you can select an option to run the copy in background.
To check the logs, transaction code — SCC3 can be used.

Import/Export
It is always recommended to use import/export option for client copy when database size is large.
Follow these steps to export a client −
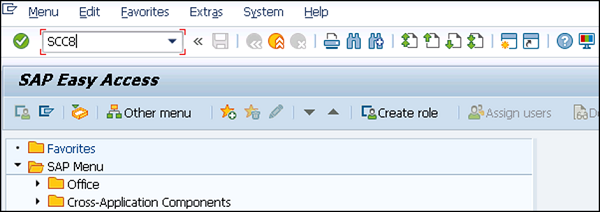
Step 1 − Log on to target system and create an entry for new target client using transaction code — SCC4. To perform export for transferring data files to target system import buffer, use transaction code — SCC8.
Step 2 − Select the profile and target system. You can schedule the export process in background. Depending on the export type, it creates multiple transport requests in the following areas −
- To hold the cross client data.
- To hold the client dependent data.
- To hold some client dependent data.
Now, follow these steps to import a client −
Step 1 − To import a client, use transaction code — STMS_IMPORT, you will see import queue.

Step 2 − Select the transport requests to perform import process that is generated from export operation. Once import is done, you can use the transaction code — SCC7 to complete post import phase. You can check import logs using transaction code — SCC3.
Deleting a Client
Follow these steps to delete a client in SAP system.
Step 1 − Use transaction code — SCC5 as below. Go to SAP Easy Access and run the transaction.

Step 2 − Select the client to be deleted. You can select > delete in background or start immediately. Table T000 contains all the client entries created using Transaction SCC4. You can also select to remove table entry for the client.

Step 3 − When you select start immediately, you see the following window.
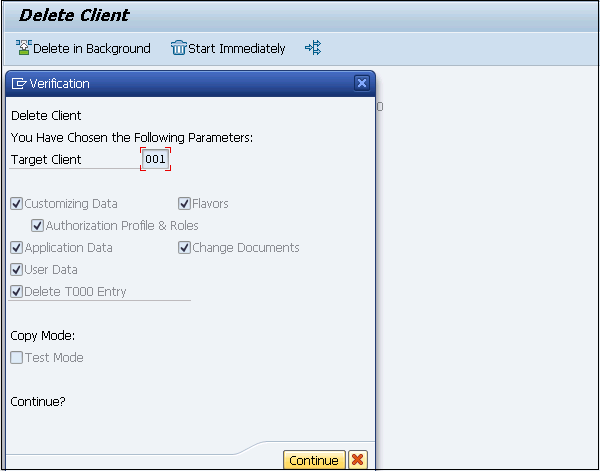
Step 4 − Click on Continue to complete the deletion.
SAP Basis - User Activities
Creating a User
This chapter guides you on how to create user accounts in SAP.
Follow these steps to create multiple users with different access rights in SAP system.
Step 1 − Use transaction code — SU01
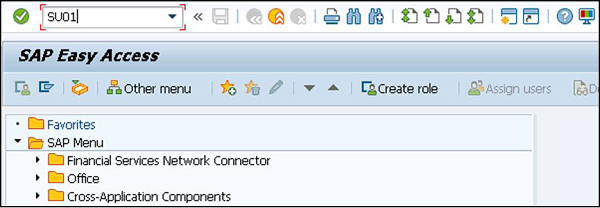
Step 2 − Enter the username you want to create, click on create icon as in the following screenshot.

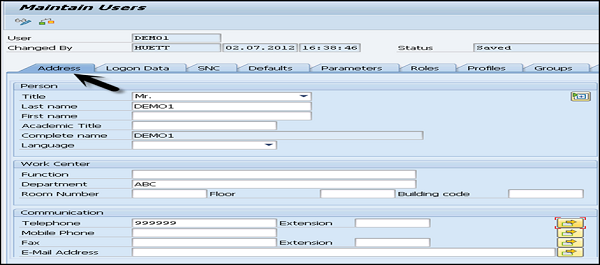
Step 3 − You will be directed to the next tab — the Address tab. Here, you need to enter the details like first name, last name, phone number, email id, etc.
Step 4 − You will further be directed to the next tab — Logon Data.
Enter the user type under Logon data tab. We have five different user types.
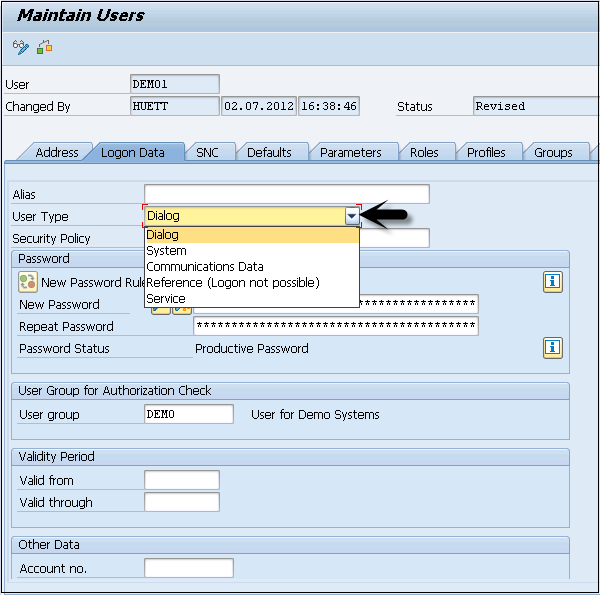
The following are the different user types −
- Dialog user − This user is used for interactive system access from GUI.
- System user − This user is used for background processing, communication within a system.
- Communication user − This user is used for external RFC calls.
- Service user − This user is created for a larger and anonymous group of users.
- Reference user − It is not possible to log on to the system with this user type. User type for general, non-person related users that allows the assignment of additional authorizations.
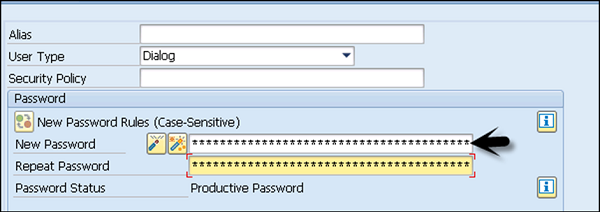
Step 5 − Type the first Login Password > New Password > Repeat Password
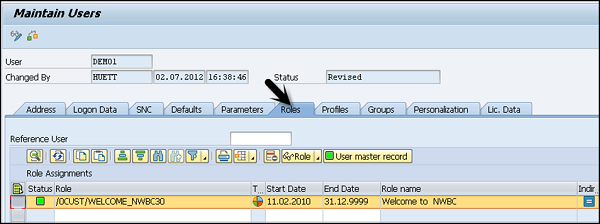
Step 6 − You will be directed to the next tab — Roles −
Assign the roles to the user.
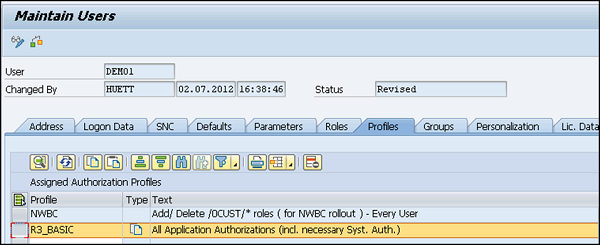
Step 7 − You will further be directed to the next tab — Profiles −
Assign the Profiles to users.
Step 8 − Click on Save to receive confirmation.
Password Reset
Follow these steps to reset password −
Step 1 − Use transaction code — SU01
Step 2 − Enter the username and select the change option at the top to edit the profile.

Step 3 − You will be directed to the next tab — Logon Data
Step 4 − Enter the new password and click on the save icon at the top.
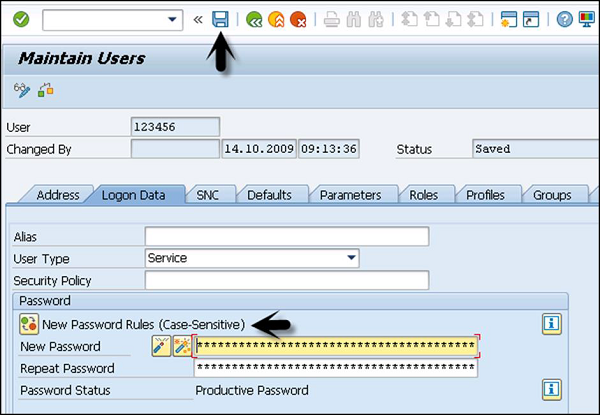
Step 5 − You will receive the following confirmation

Lock / Unlock a User
In SAP system, an administrator can also lock or unlock a user as per the requirement. This can be performed for a specific time period or permanently. A user can be locked/unlocked in the following two ways −
- Manually/Forcefully
- Automatically
Manually or Forcefully
You can lock a user forcefully/automatically using these transaction codes −
- Transaction code — SU01 for single user
- Transaction code — SU10 for multiple users
Step 1 − Execute transaction code — SU01
Step 2 − Select the user you want to lock/unlock and click on the icon.

Step 3 − You will now see the current status of the user. Click on lock/unlock option.

Step 4 − To lock multiple users, use transaction code — SU10 and enter the users in username list. To select multiple users in one go, click and search you will get an option to select multiple users at one time.
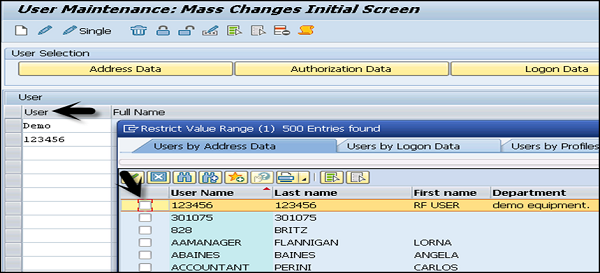
Step 5 − Select the lock and unlock icon at the top as per requirement. This can be used to unlock single/multiple users using same transaction code.
SAP Basis - Number of Login Attempts
You can set the number of incorrect login attempts and then system can end the session or can also lock the user account if parameter value is set by the administrator. The following two parameters are used to limit the login attempts −
- Static − This parameter doesn’t apply immediately. the system needs restart for this.
- Dynamic − This parameter can be applied directly and the system does not need to restart for this.
Follow these steps to set the value of parameters −
Step 1 − Use transaction code — RZ11.
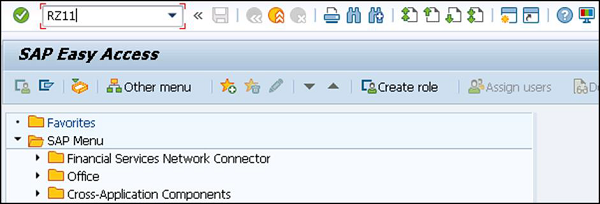
Step 2 − Enter the parameter name and click on Display. To edit a parameter, click on Edit.
Step 3 − To set the number of failed attempts, put parameter name — login/fails_to_session_end. You can put any parameter name.
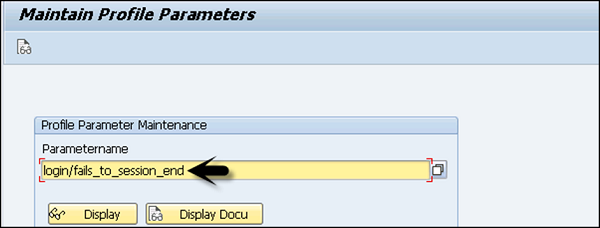
Step 4 − To check the current policy, click on Display.
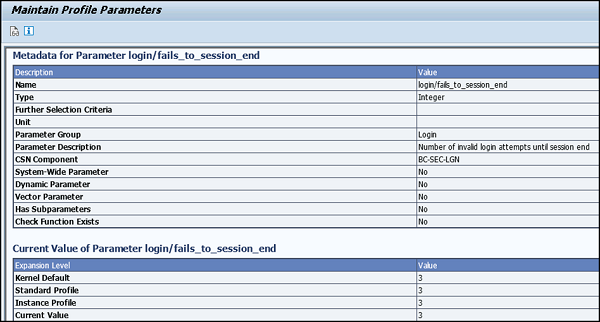
Important parameters to limit login attempts
- ogin/fails_to_session_end − This parameter defines the number of times that a user can enter an incorrect password before the system ends the logon attempt. The parameter should be set lower than the value of parameter.
- login/fails_to_user_lock − This parameter is used to define the number of times that a user can enter an incorrect password before the system locks the current user account. The default value is 12 and can be set to any value between 1 and 99 inclusive.
Password Policy
It is also possible to define password policy for users in SAP system in the following ways −
- A user has to set minimum password length.
- There needs to be an expiry policy for the passwords.
- Password complexity and other such aspects need to be considered too.
The following parameters are used to define system password policy −
login/min_password_lng
This is used to define minimum password length. The default value for this field is 3 characters and can be set to any value between 3 and 8.
login/password_expiration_time
This parameter is used to define the number of days after which a password expires. To allow users to keep their password from expiring without any limit, set the default value to 0.
Limit Users on Password Selection
You can also select the password which you don’t want users to choose. These passwords are maintained in table USR40 and transaction code SM30 is used for this purpose.
There are two wildcard characters −
- ?- stands for a single character.
- *- stands for a sequence of any combination characters of any length.
If you select 123* in table USR40, it means that any password that begins with the sequence "123." is prohibited.
If you enter *123*, it prohibits any password that contains the sequence "123."
If you select AB?, passwords that begin with "AB" and an additional character will not be allowed. For example — "ABB", "ABF", etc.
Transaction Code — SM30
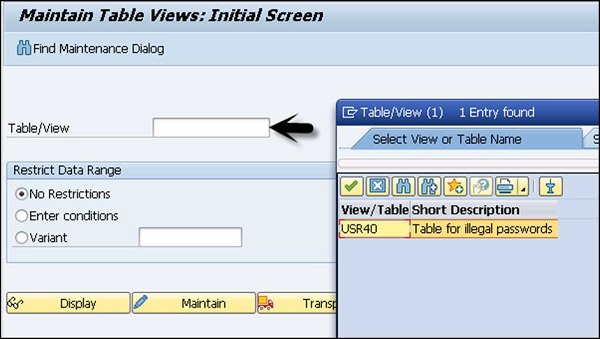
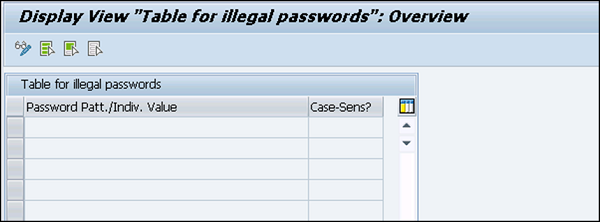
Select the table and click the Display button below. Enter the password string.
SAP Basis - Job Processing
Executing Background Jobs in SAP
Background jobs in SAP system run in the background without affecting normal operations in the system. These jobs are used to reduce manual effort and to automate the process. They can run in the background without any user input and can be scheduled to run when the system load is low.
Background jobs can be divided into three categories −
Class A (High Priority)
This is used for urgent or critical tasks and must be scheduled with class A priority job. Class A job reserves one or more background work processes.
Class B (Medium Priority)
These jobs are executed after the completion of high priority jobs of Class A.
Class C (Low Priority)
The jobs in this category run once class A and class B jobs are completed.
Transaction Code SM36

General Data
Enter the Job Name and its Priority.
Select the target server on which you want to execute the job. This is used for load balancing; you can define the target server on which you want to run the job.

Using Spool List Recipient, enter the email id if you want to get the results in email.
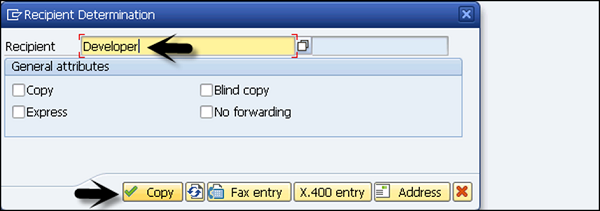
To define the steps for execution, go to the Step Tab. Enter program name, variant name in the field. If you have not created variant as per your requirement, then leave it blank. Click on the save button at the bottom.


To pass the start condition, enter the start date, end date, frequency, etc. In case the start condition is not specified, then the job will remain in scheduled state and will not run. Various options can be used to define the start condition. To create a periodic job, select the box at the bottom.
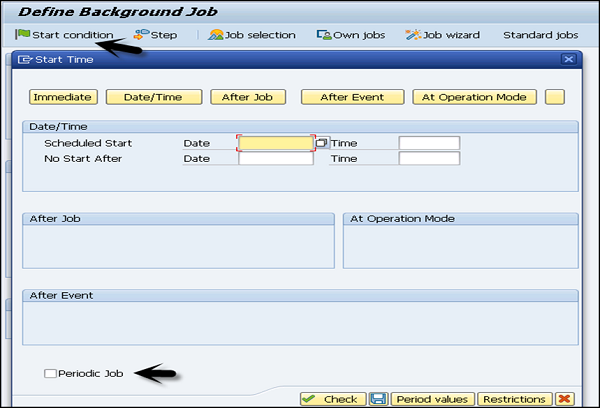
Once the schedule is defined, click on Save.
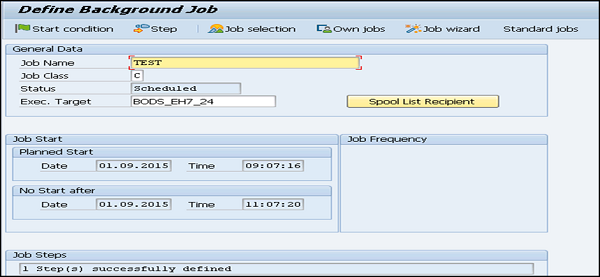
SAP Basis - Unscheduling a Background Job
To unschedule a job so that it doesn’t run in future, you have to release the job.
Follow these steps to unscheduled a background job −
Step 1 − Use transaction code — SM37
(If a job is in active state, it can’t ne unscheduled till it’s completed.)
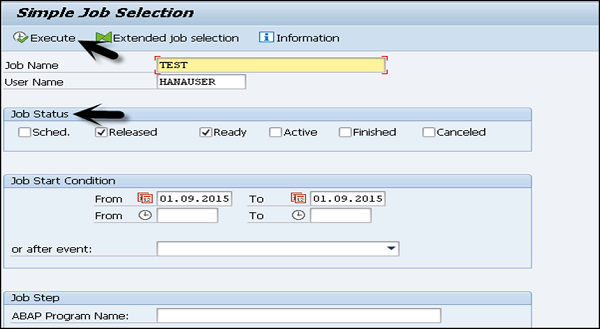
Step 2 − Enter the job name and username. To unschedule a job, select Released and Ready from the Job Status tab. Enter the Job Start Condition and click on Execute.
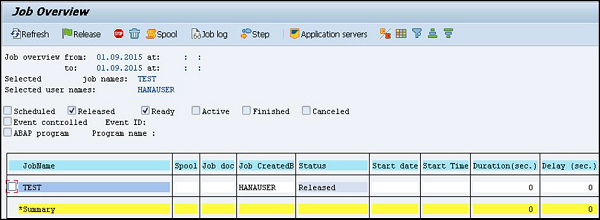
Step 3 − You will receive the confirmation and also the other details of the Job as in the above screenshot once the job is released.
SAP Basis - Monitoring a Background Job
Monitoring a background job is important in SAP system because once you schedule the job it might be cancelled due to some error.
Follow these steps to monitor a background job −
Step 1 − Use transaction code — SM37
Step 2 − Use * in the Job Name column and select the status to see all the jobs created by this user. Also enter the date range as per the requirement and then Execute.
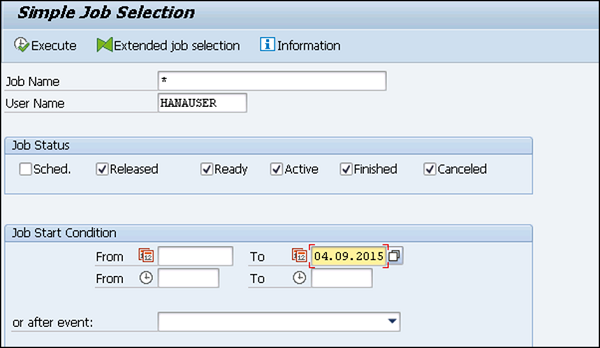
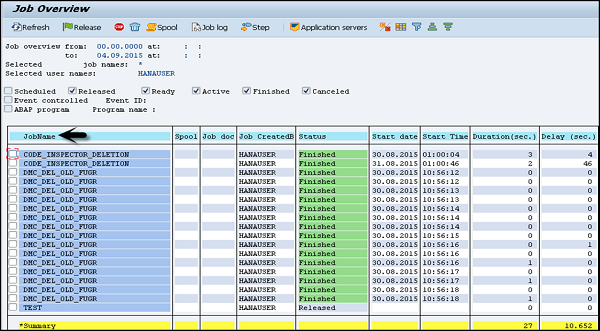
Step 3 − Upon execution, all the jobs that have been created by the mentioned user and match the selection criteria are displayed.
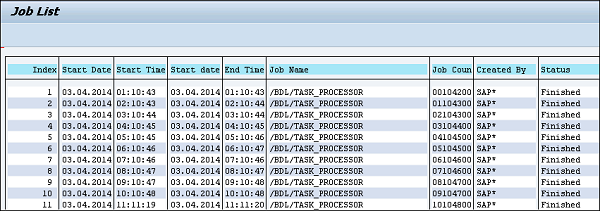
Details like Job name, Job Created By, Status, Start Date, Duration, Delay, etc. are shown.
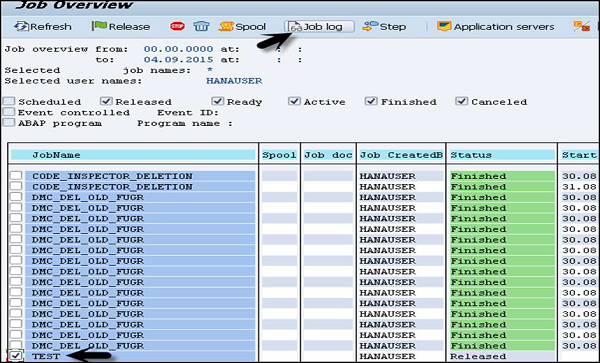
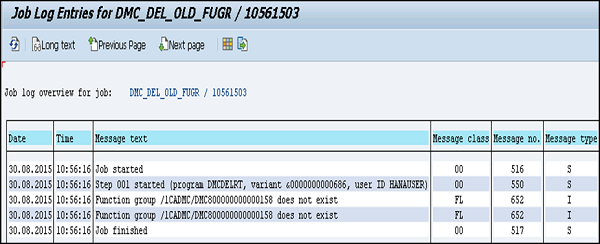
Step 4 − To check the job log, you can select the job and click on the Job Log button.
SAP Basis - Deleting a Background Job
You can delete jobs from the SAP system. These jobs may no longer be required and may occupy a lot of space on the system. Jobs can be deleted in the following two ways −
- Single Job
- Multiple Jobs
Follow these steps to delete a single job −
Step 1 − Use transaction code — SM37.
Step 2 − Use * in the Job Name column and select the status to see all the jobs created by this user. Also enter the date range as per the requirement and then Execute.
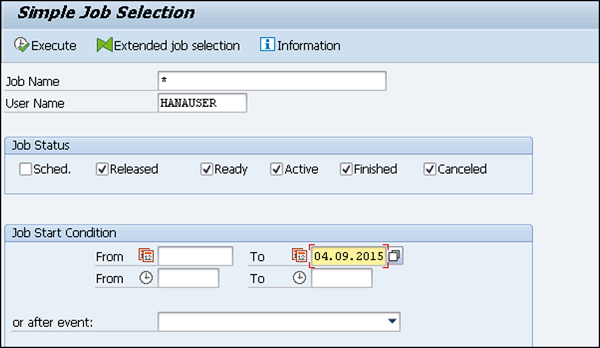
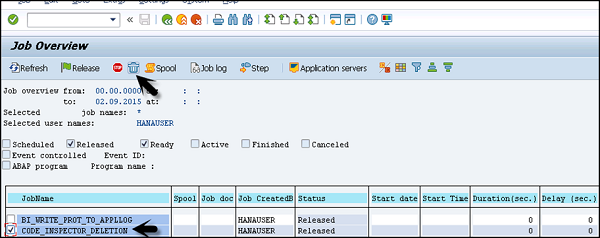
Step 3 − Upon execution, all the jobs that have been created by the mentioned user and match the selection criteria are displayed.
Details like Job name, Job Created By, Status, Start date, Duration, Delay, etc. are shown. Select the job you want to delete from the database → Delete
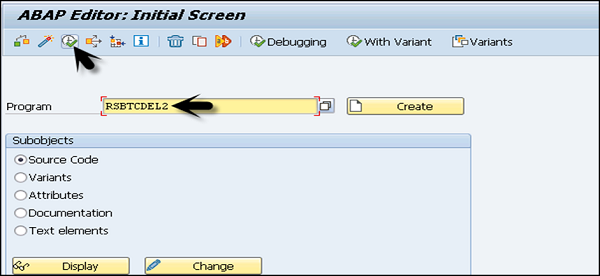
Step 4 − To delete multiple jobs, use transaction code — SE38. Use report — RSBTCDEL2 (New version of RSBTCDEL). Old job logs will be deleted and will not show in the job overview. Enter program and click on Execute.
Step 5 − In the next screen, enter the details such as the Job Name you want to delete. You can put * to indicate all jobs. If you want to delete jobs from a specific user, enter the username.
Step 6 − Mention the status of Jobs to be deleted and the time period of deletion.
Step 7 − Specify Commit — Commit value is proportional to program performance. If the commit value is high, then job deletion will run faster. Recommended value is >= 1000.
Step 8 − Check Test run to simulate the deletion and this way jobs will not be deleted. When you are sure, uncheck the Test run and press Execute.
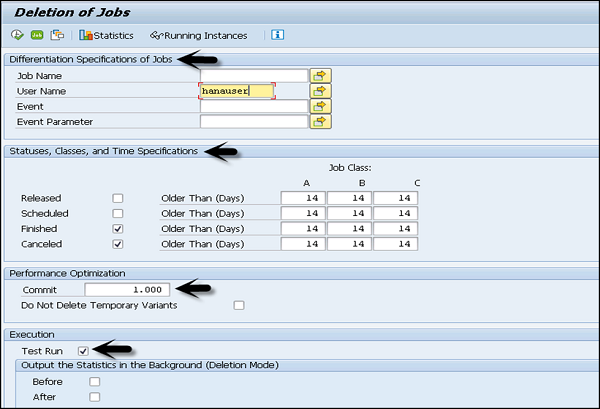
Step 9 − When you click on Test run, it will show you the list of all jobs matching the criteria. If there is any change you want to make, you can do it before completing the deletion.
SAP Basis - Managing Transports
Transport Management System Overview (TMS)
Transport Management System is one of the key components in SAP system. TMS is used to control new requests, monitor changes like who has implemented the changes, defining and configuring system landscape in SAP environment.
TMS consists of 3 different Change and Transport System (CTS) components −
Change and Transport Organizer (CTO)
Transaction Code — SE01
This is used to manage, configure the changes in SAP repository and other objects. This provides you a central environment for development and configuration projects.
Transport Management System (TMS)
This is used to manage, control and copy development objects and for customization of settings across SAP systems in landscape using pre-defined transport routes configured with RFC Connections. This includes exporting the objects from one SAP system and importing to another target system.
Transport Tools
Tools are a part of SAP Kernel and are used to manage R3 trans and transport control program.
R3trans is known as SAP system transport which is used to transport the objects between different SAP systems. It is usually called for other transport control program, in particular from tp or by using SAP upgrade utilities.
Transport control program is used to support data and object transport between different systems running on different platforms and also on different database.
Configuring Transport Management
Transport management is one of the key components in SAP system landscape and is used to perform the following activities −
- Defining Transport Domain Controller.
- Configuring the SAP system landscape.
- Defining the Transport Routes among systems within the system Landscape.
- Distributing the configuration
Transport Domain Controller
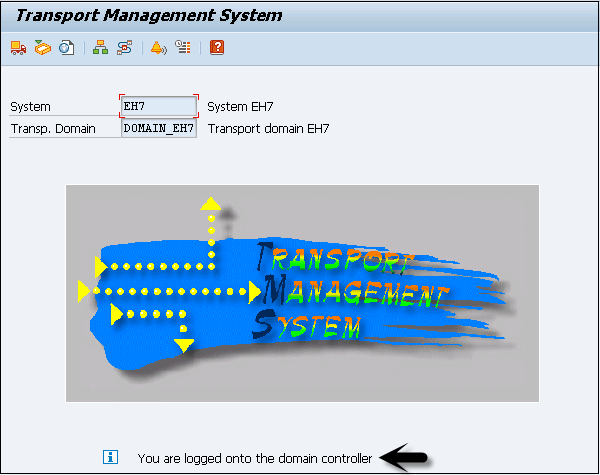
This is used to manage all TMS configuration details. Any changes to configuration settings are distributed across all systems. To set up the Domain controller, use transaction code — STMS
In case, the SAP system doesn’t have a Domain Controller, you will be prompted to create a new one. Transport domain includes the following activities −
- User creation TMSADM
- RFC connection and request creation, TMSADM is used login to target system
- DOMAIN.CFG file is created under usr/sap/trans/bin directory which stores TMS configuration and is used by systems and domains for checking existing configurations.
Follow these steps to add a system to Transport domain −
Step 1 − Log on to the SAP system, that you want to add as a System, in client 000 and enter the transaction code — STMS. If system is not added, TMS will check configuration file DOMAIN.CFG and will prompt you to create one. Click on — Select the Proposal and Save. The system will remain in ‘Waiting’ status initially.
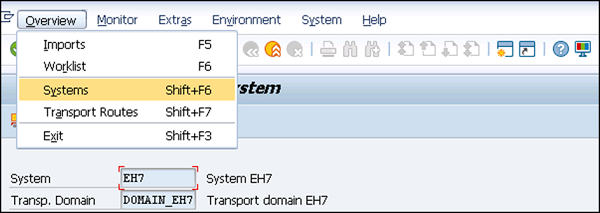
To complete the task→ login to the Domain Controller System → Transaction STMS → Go to Overview → Systems.
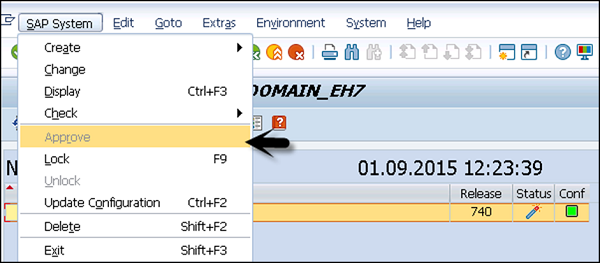
You can now see that a new system is available. Go to SAP System → Approve

SAP Basis - Managing Transport Routes
Transport routes are defined as routes that are defined by a SAP Administrator to transmit the changes between different SAP systems.
The following are the two types of transport routes −
- Consolidation (From DEV to QAS) — Transport Layers are used
- Delivery (From QAS to PRD) — Transport Layers not required
Transport Request
This contains a number of changes to be implemented in the development system. It consists of the types of changes, purpose, change category, target system and other details.
Transport request are named in a standard format like <SID>K<Number>
For example, in <SID>K<Number> −
- SID represents System ID
- K stands for fixed keyword/alphabet
- Number can be anything from a range starting with 900001
There are two type of request types that can be created in the SAP system −
Workbench Request
This request type contains the repository objects and cross-client customizing objects. Workbench requests are used to make changes in the ABAP workbench objects.
Customizing Request
This request type contains objects that belong to ‘client-specific’ customizing. These requests are created in system automatically when a user performs customizing setting and a target system is automatically assigned as per the transport layer.
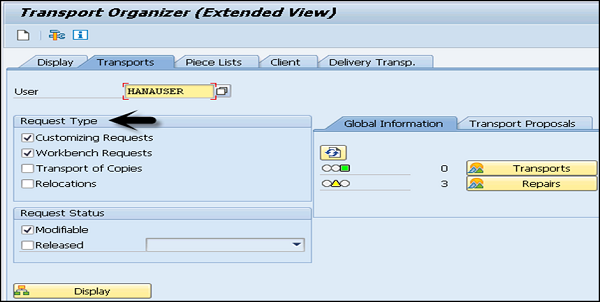
To create a Transport Request, use transaction code — SE01
A Transport Request can be created in the following two ways −
- Automatic − This way you can create or modify an object, or perform customizing settings. Here, the system displays the 'Dialog box' for creating a transport request or mention name of an already created request, if available.
- Manual − This way you can create the transport request from the Transport Organizer, and then enter required attributes and insert objects.
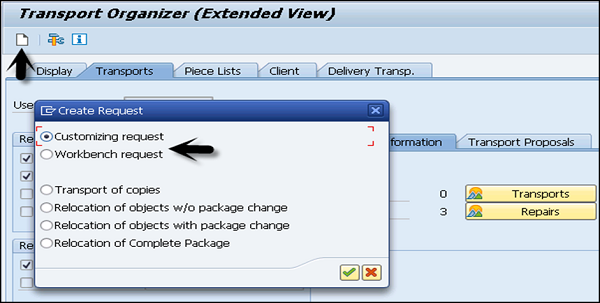
Import / Export of Objects
Once transport request is completed in the source system, you have to export the request from the source system and import it to the target system. To perform the import, you have to select an import queue.
Transaction STMS → Import or you can go to Overviews tab at the top → Imports
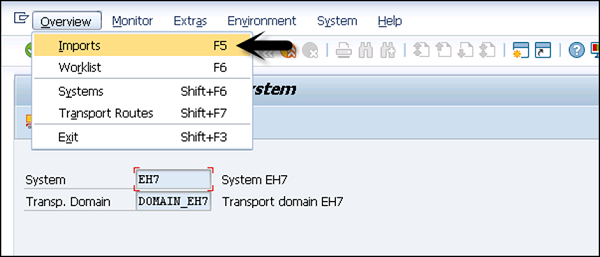
You can see a list of systems in the current domain, description and a number of requests available in Import Queue and the status.

Import a Queue
This list contains Transport Requests in the common directory. These requests are ready to be imported to the target system.

To add a request manually, you can go to other requests → Add (you should know the name of Transport request).

Transport Request Logs
You can also check the logs once the transport request is completed. To check the logs, use transaction code — SE01 → GoTo → Transport Logs

There are two types of logs available in Transport Management System −
Transport Logs
It keeps track of the transport log files that have been moved in a Transport Request.
Action Log
It includes the details of all the actions that have been performed in a Transport Request. Actions such as exports, import, etc.
One of the important functions provided by the logs are the following return codes −
- 0 − This value represents that export was successful.
- 4 − This value represents that a warning was issued and the objects were transported successfully.
- 8 − This value represents that a warning was issued and at least one object could not be transported.
- 12 or higher − This value represents an error in transport request and it is generally not caused by the objects in Transport Request. This probably occurs because of system failure.
SAP Basis - Patch Management
In SAP system, a patch is used to fix a bug. There are different types of patches that can be used in SAP system. All patches start with SAPK followed by patch type.
The following are the four different types of patches −
- ABAP (SAPKA620XXXX)
- BASIS (SAPKB620XXXX)
- HR (SAPKE470XXXX)
- APPLICATIONS (SAPKH470XXXX)
A patch follows this structure — SAPKA <Rel><No>
Patches are also called support packs and they should be applied in the following sequence −
- BASIS (SAPKB620XXXX)
- ABAP (SAPKA620XXXX)
- HR (SAPKE470XXXX)
- APPLICATIONS (SAPKH470XXXX)
Support Packages and Add-ons
As the name suggests, support packages are used to fix the bug and to improve the quality of SAP system. Support package implementation and administration is done with Transaction Spam (Support Package Manager). Each support package is valid for one release and Support Package Manager ensures that all support packages are applied in a specified order.
Support packs are applied in the above mentioned order — Basis > ABAP > HR > Applications. It is not necessary that Basis and ABAP patch levels should be same but SAP recommends that they should be at the same level. Generally, Basis and ABAP should be applied together however to apply one first, it should be Basis.
All support packs are applied with client 000. Support packages should be imported at regular intervals to avoid errors and to keep system landscape up to date.
There are different types of support packages available −
- SPAM Update − A SPAM Update contains updates and improvements to Support Package Manager (SPAM) and Add-On Installation Tool.
- Component Support Package − This contains improvement for one software component such as SAP Basis, SAP HR or SAP APPLICATIONS and to update repository and dictionary objects.
The following table shows some naming conventions for Support Packages −
| Software Component | Name |
|---|---|
| SAP_APPL | APPL Support Package |
| SAP_BASIS | Basis Support Package |
| SAP_ABA | Application Interface Support Package |
| SAP_HR | HR Support Package |
| SAP_BW | BW support Package |
- Conflict Resolution Transport − This is used to adjust the support packages on add on. A CRT for one release also contains adjustment for earlier releases of this add-on.
Requirements to Implement Support Package
A support package is always implemented on client 000 and user should have an authorization equivalent to DDIC or SAP.
To implement a support package, use transaction code — SPAM. You can check if any previous package is in progress or is incomplete. If there is an incomplete support package, you can’t proceed with the implementation of a new one.
Note − Transport directory /usr/sap/trans should have enough space.
Support Package and Stack Update
You can download support package from SAP Service Market place. Open the link — service.sap.com and login with your SID.
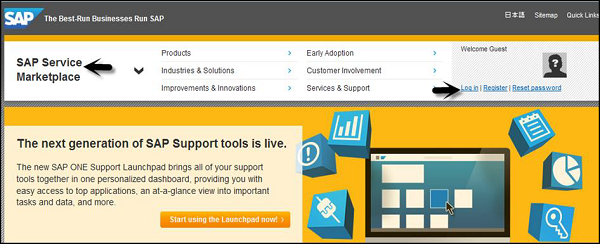
Go to SAP Support Portal from the dropdown → Software Downloads


Go to Support Packages and Patches under software downloads. Now, go to Software Downloads.
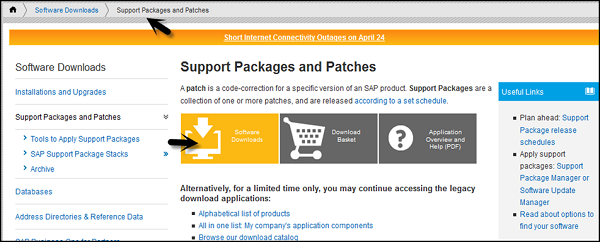
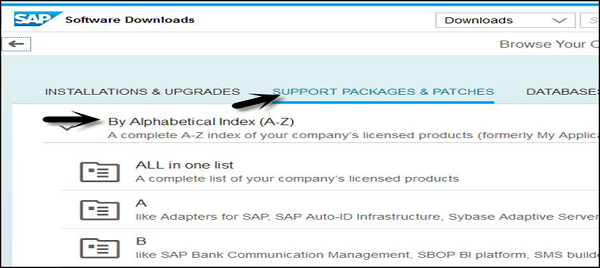
Download the support package and save in OS level Transport directory /usr/sap/trans
Uncompress the file- sapcar –xvf <support package name>
You can see .ATT and .PAT files in Transport directory.

To load the support package from application Server, use transaction code — SPAM. Support Package → Load Packages → From Application Server


Or you can also load it from Front End in case it is < 10 MB. The support packages which are in the form of .car will be decompressed into eps/in directory.
If the size of the Support Package is greater than 10mb, then copy the support packages to /trans directory as above and uncompress to .ATT and .PAT files.
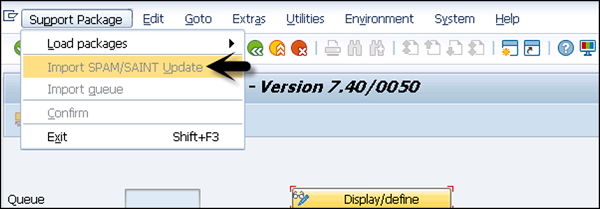
SPAM Update
You can also update Support Package Manager and Add-on installation tool. This should be performed before any support package upgrade.
SAP Basis - Importing a Queue
Queue is used to check support packages for different SAP components in your system landscape.
Follow these steps to import a queue −
Step 1 − Click on Display/Define button and you will see a list of installed software components.


Step 2 − Select the component and it will display the list of Support Packages available for the selected components. If this is the queue you are looking for, click Confirm Queue.
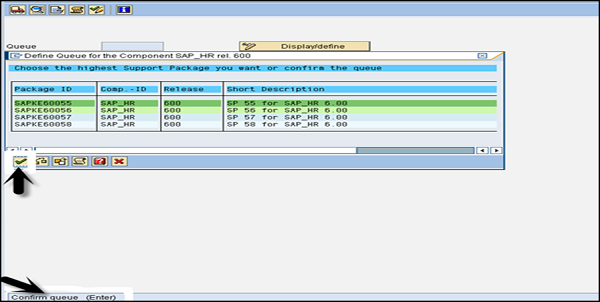
Step 3 − You will receive confirmation - Support Package Queue Saved and Defined.
Step 4 − Now, import queue to start implementing the Support Package. Click Support package → Import Queue.
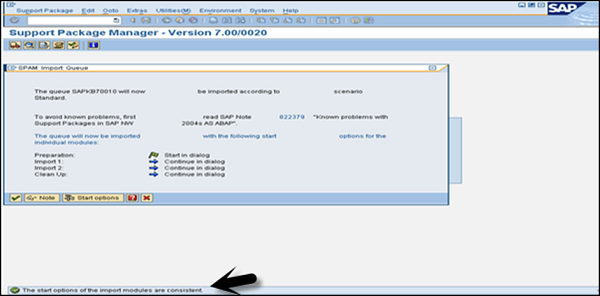
Step 5 − Confirm the queue once the support package is imported successfully. If you don’t confirm the queue, you won’t be able to import support package in future. Check the SPAM status → Confirm successful import of support package.

The following issues occur while implementing Support Packages −
- Tablespace overflow
- Kernel outdated
- SPAM/SAINT outdated
- Check environmental variables
- RDDIMPDP job not scheduled
- Inconsistency in TMS
- Max extents reached
- Space constraint in Transport directory
- “tp" could not connect to database (Execute R3trans –d which will generate trans.log)
- STMS configuration issue
- Background jobs terminated due to memory-related issues
The following table shows the default values of Support Package Manager −
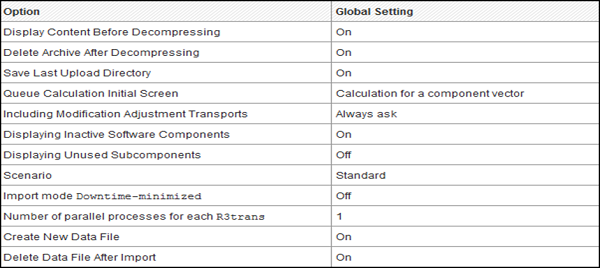
To save on the hard disk space, you can specify if data files need to be deleted after the Support Packages have been imported. As mentioned, this is the default setting in Support Package Manager.
SAP Basis - Kernel Upgrade and Patching
Kernel is an executable program that exists between SAP Applications and Operating System. It consists of executable program under the path — "/sapmnt/<SID>/exe" for UNIX and \usr\sap\SID\SYS\exe\run Windows. It starts and stops application services such as message server, dispatcher, etc.
In Kernel upgrade, new .exec files replace old executable files in SAP system. To check the current version, use transaction code — SM51 > Go to Release Notes.
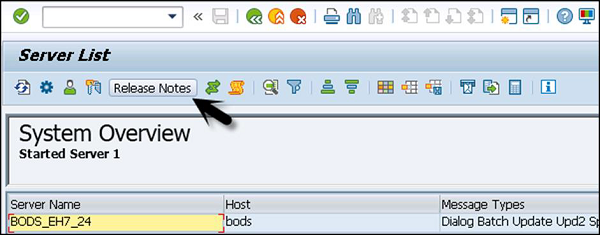
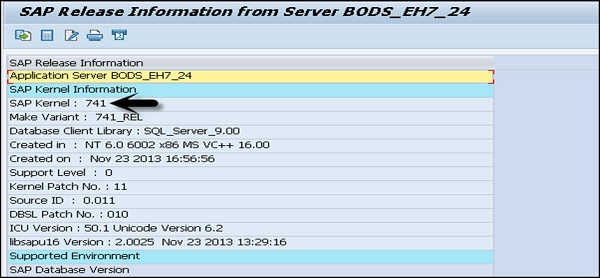
To check the status, go to System → Status tab → Other Kernel info

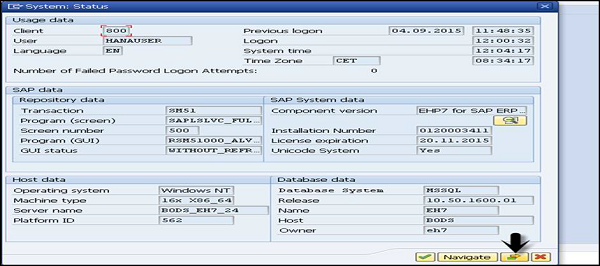
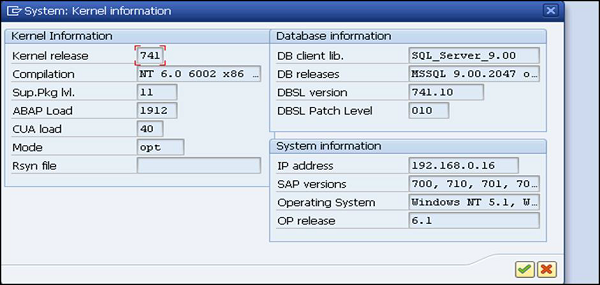
In UNIX, use disp+work − version to see information on the current Kernel version.
Follow these steps to download Kernel from SAP Market Place −
Step 1 − Open URL — https:\\service.sap.com and login with SID and password.
Step 2 − Go to SAP Support Portal from dropdown → Software Downloads.


Step 3 − Go to Support Packages and patches under software downloads. Go to Software Downloads.

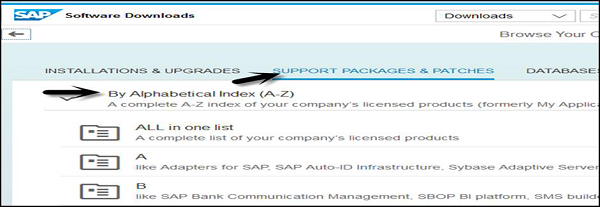
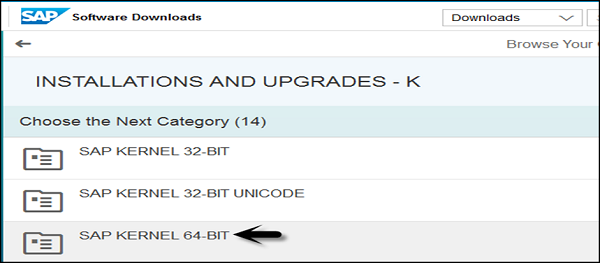
All Kernel Versions are available in 64-bit −
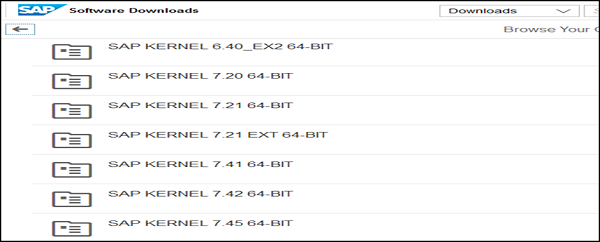
Step 4 − Select the Kernel version and download the files as per the Operating System – Windows, Linux, Solaris, AIX, and HP-UX.

Upgrade Kernel Version
Let us now follow these steps to upgrade the Kernel version −
Step 1 − Create a directory with enough disk space and enter the name of directory.
Step 2 − Copy the upgrade files SAPEXEDB.SAR & SAPEXE.SAR files to the new directory at OS level.
Step 3 − To check directory, use 'pwd' to ensure you are in the same directory.
STep 4 − Now, uncompress .SAR files by sapcar exe.
SAPCAR –xvf sapexe.SAR
SAPCAR –xvf sapexedb.SAR

Step 5 − To take backup of existing Kernel, you have to create one more directory with the name "exe_old<ddmmyy>" and take backup of existing Kernel file.
Step 6 − To perform upgrade, stop the SAP application. You don’t need to shut down the database for Kernel upgrade but you need to stop the SAP application using this command — stopsap r3.
Step 7 − Copy the files from the new kernel directory exe_new<ddmmyy → to the existing kernel directory exe.
Step 8 − Use this command to copy — cp -rp /sapmnt/<SID>/exe_new<ddmmyy>/* /sapmnt/<SID>/exe/
Step 9 − Now if you check the current Kernel version using disp+work, then check the kernel version from OS level by the command disp+work − versions and new patch version should be displayed.
Step 10 − Login to the operating system as root specific to UNIX. Execute the script in Kernel directory — ./saproot.sh <SID>
You use this to assign correct permissions to all the executable programs in the kernel such as br* file etc.
Step 11 − Start SAP Applications using this command — startsap r3.
Step 12 − If you run Transaction SM52, you can see current kernel version level.
SAP Basis - System Monitoring
System monitoring involves proactive monitoring of application servers, CPU utilization, database space, monitoring log files, etc.
System monitoring also includes the following −
- Batch jobs monitoring
- Database performance monitoring
- Monitoring application users
- Spool request monitoring
- Print requests
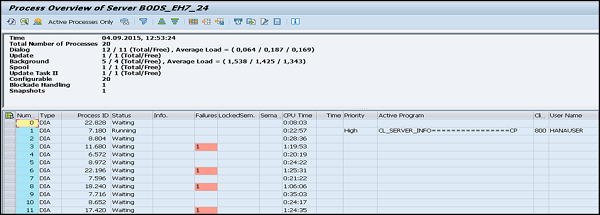
To monitor the SAP system, use transaction code — SM51

To check the list of processes, go to Processes icon.
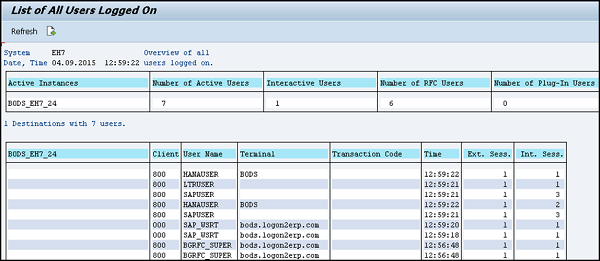
To monitor application users, use transaction codes — AL08 and SM04
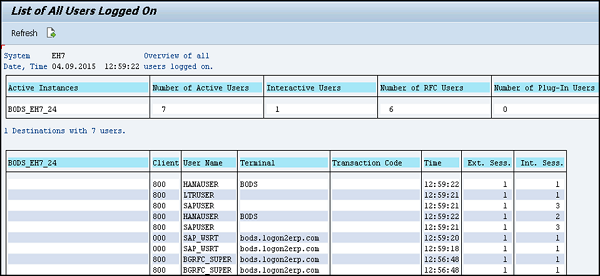
Use transaction code — SM04
To monitor update processes, use transaction code — SM13. In User field enter ‘*’ and click on Execute.
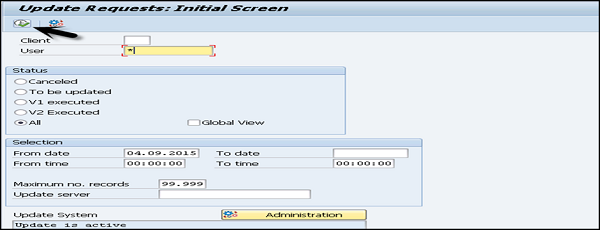
If there is no pending request, queue will be empty as in the following screenshot −

The following table shows important transaction codes for system monitoring and performance checks −
| Monitoring System Log | SM21 |
| Tune Summary | ST02 |
| CPU Utilization | ST06 |
| ABAP Dumps | ST22 |
| Spool Request Monitoring | SP01 |
| Monitoring Batch Job | SM37 |
| Database Administration | DB02 |
| Database backup logs | DB12 |
SAP Basis - Remote Function Call
What is RFC?
To communicate between SAP systems, there is a need to define a mechanism. One of the most common ways is to define Remote Function Call (RFC Connection) between two systems. By creating a trusted RFC connection between two systems, it allows you to create trusted-trusting relationship between systems wherein, you can communicate and exchange information and data.
There are different types of trusted RFC connections.
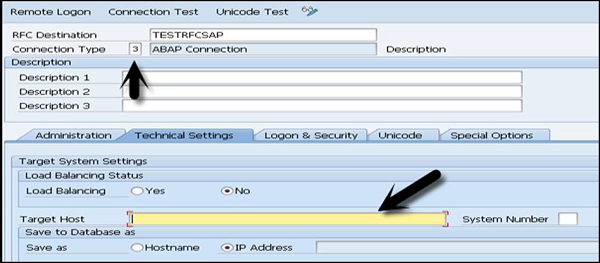
Type 3 Connection
This connection type is used to specify connection between ABAP systems. Here, you need to mention the host name and IP address of source system and also the logon information. This is applicable for both type of RFCs, between ABAP systems and external calls to ABAP systems.
Type I Connection
This connection type is used to specify ABAP systems connected to the same data base as the current system. Let us take an example entry name — ws0015_K18_24
ws0015=host name
K18=system name (data base name)
24=TCP-service name
Type T Connection
This connection type helps connect destinations to external programs that use the RFC API to receive RFCs. This can be activated using start or registration.
SAP Basis - RFC Between SAP ECC & HANA
Creating a Trusted RFC between SAP ECC and HANA
Suppose, you want to set up a trusted RFC towards target system BB1 on your source SAP system AA1. With the completion of the setup, you would be logged onto AA1 and your user would have enough authorization in BB1; you can use the RFC connection and logon to BB1 without having to re-enter username and password.
Using RFC trusted/trusting relationship between two SAP systems, RFC from a trusted system to a trusting system, password is not required for logging on to the trusting system.
Open SAP ECC system using SAP logon. Enter transaction code SM59 → this is the transaction code to create a new Trusted RFC connection → Click on the 3rd icon to open a new connection wizard → click on Create and a new window will open.


RFC Destination ECCHANA (Enter name of RFC destination) Connection Type — 3 (for ABAP system)
Go to Technical Setting.
Enter target host — ECC system name, IP and enter system number.
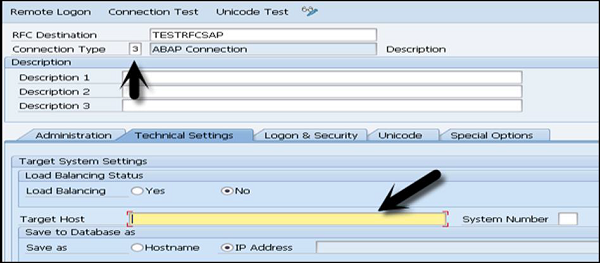
Go to Logon & Security Tab, Enter Language, Client, ECC system username and password.

Click on the Save option at the top.

Click on Test Connection to successfully test the connection.

Configuring RFC Connection
Follow these steps to configure RFC connection −
Step 1 − Run transaction — ltr (to configure RFC connection) → New browser will open→ Enter ECC system username and password and logon.

Step 2 − Click on New → New Window will open → Enter configuration name → Click Next → Enter RFC Destination (connection name created earlier), Use search option, Choose name and click Next.
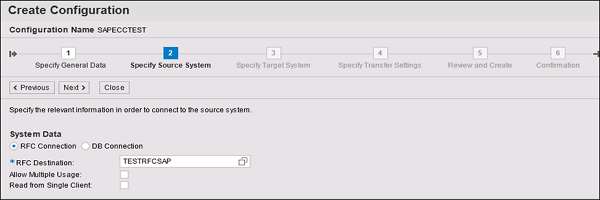
Step 3 − In Specify Target system, Enter HANA system admin username & password, host name, Instance number and click Next. Enter number of data transfer jobs like 007 (it can’t be 000) → Next → Create Configuration.
Testing Trusted RFC
Click on Test Connection to successfully test a connection.


SAP Basis - New Dimensional Product
Introduction to BI / BW
SAP BI/BW is a data warehousing product and is based on SAP ABAP infrastructure. It is used to convert raw data into reports. This can also be used to build analytical reports and for decision making by business managers.
Using a Business Warehouse, you can combine data from different heterogeneous sources, organize and manage the data for detailed reporting.
This data warehousing product can easily be integrated with different SAP reporting tools. This product can help to analyze multidimensional data from different sources.
The key components in SAP NetWeaver Business Intelligence are −
- SAP NetWeaver Business Warehouse (BW)
- SAP Business Explorer (SAP BEx) and
- SAP NetWeaver BW Accelerator (BWA)
Besides replicating data from the source to the SAP NetWeaver BW system, it is also possible to access the source data directly from the SAP NetWeaver BW system using Virtual Providers. The analytic engine provides methods and services for analysis, planning and generic services such as caching and security.
SAP Business Explorer BEx is used to define how data is displayed. This tool also supports the creation of Excel-based and web-based applications for analysis, planning, and reporting. The BEx applications created with the BEx tools can be integrated into the SAP Enterprise Portal. Integration with SAP BusinessObjects tools offers further options for analysis and reporting in addition to the standard SAP BEx functions. You can access BI information (like reports, analysis and dashboards) with the SAP BusinessObjects BI Portal InfoView.
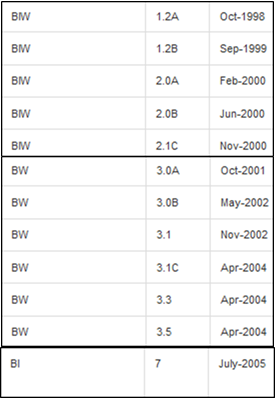
Basis Integration with ECC
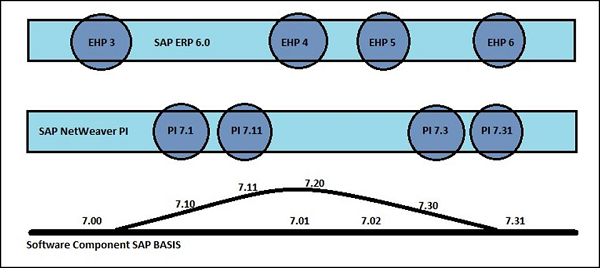
SAP ERP is based on SAP NetWeaver version. For example, SAP ERP 6.0 is based on SAP NetWeaver 7.0. SAP ERP is also based on enhancement packages; for example, ERP 6.0 is based on EHP04 and NetWeaver Enhancement Package — EHP01.
The software components always follow product numbering like SAP HR 6.04 belongs to Enhancement Package 4 for SAP ERP 6.0 and SAP BASIS 7.01 belongs to EHP01 for SAP NetWeaver 7.0.
Likewise,
- SAP ECC 6.0 Enhancement Package 5 is based on SAP NetWeaver 7.0 Enhancement Package 02
- ECC 6.0 Enhancement Package 4 is based on SAP NetWeaver 7.0 Enhancement Package 01
- ECC 6.0 Enhancement Package 6 is based on SAP NetWeaver 7.0 Enhancement Package 03
Implementation of an EHP for ECC involves the application of SAP NetWeaver EHP (starting with ECC EHP 4).
